
NOTE from 2024: I wrote the original post in 2013. Since then I’ve started using an iPad with a lightweight storebought cupholder mount that works really well. This might be an option for you. Read on for one way to build your own laptop computer mount for your car or truck.
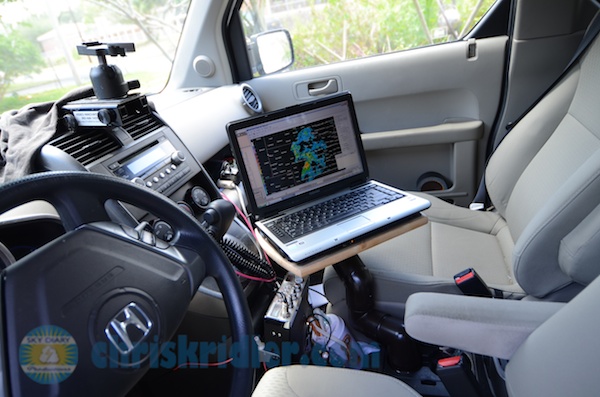
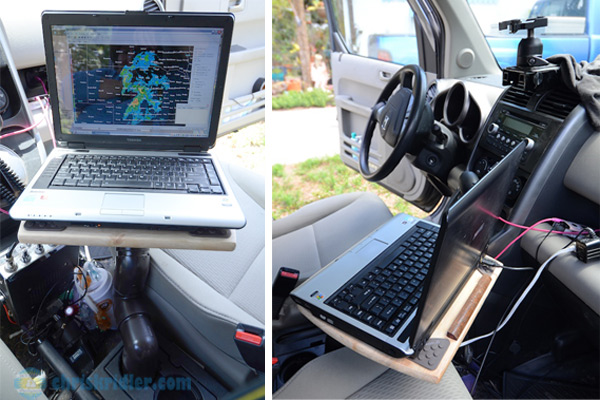
Here’s a laptop mount I made for my storm-chasing vehicle with PVC pipe and a cutting board. Photo by Chris Kridler, ChrisKridler.com, SkyDiary.com
This will be my 17th season chasing storms, and in all that time, I’ve never had a proper car mount for my laptop. Before you freak out, fear not; I’m not surfing the web while driving. But like other chasers, I like to run GPS software in conjunction with a program that displays radar information so I know whether I’m driving into a storm; basically, it’s your GPS on steroids. And when stopped, I can page through other data online.
Over the years, I’ve tried some nutty solutions: a metal rack with a 90-degree bend in it, the kind you put in a roasting pan; a child’s lawn chair; and various perches on my center console and passenger seat, depending on whether I had a chase partner. None worked well. I decided this year to get a real laptop mount – but the really nice Ram and JottoDesk mounts aren’t cheap. From what I’ve read online, I also had doubts that there would be one that perfectly fit my current model of car, a 2010 Honda Element. So I did some searching online and found this excellent page put together by Mike Davis, who built a laptop mount for his Toyota Tacoma using PVC that fits into his cup holder. I don’t know Mike, but I’m grateful to him for sharing his design with the world.
Using a cup holder almost sounded too easy. And it is, in a way. I still haven’t been able to achieve the perfect snug fit that he apparently did, but nonetheless, inspired by his design, I’ve put together a pretty functional laptop mount for less than $30. Mine isn’t exactly like Mike’s, so I think it’s worth sharing. Between Mike’s page and my page, perhaps you can find a design that will work for you. I’m no engineer (obviously!), so you’ll have to judge for yourself whether your version safely fits your needs.

PVC parts for the laptop mount: two each of different types of elbows; a drain for attaching to the tray; and a ridged piece to make it fit better in the cup holder. Photo by Chris Kridler, ChrisKridler.com, SkyDiary.com
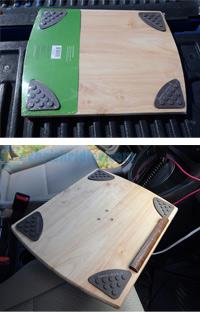
For the laptop tray, I used a cutting board that already had rubber feet, which would go on top to help hold the computer in place. A piece of quarter-round molding also helps steady the laptop. Photo by Chris Kridler, ChrisKridler.com, SkyDiary.com
First, I went to the big box store and played Tinker Toys with the PVC pipe pieces. A two-inch width was the closest to fitting into my cup holders – there are two holders between the front seats. Though you may opt for different pieces, these are the ones I chose – two 90-degree elbows, two 45-degree elbows, and a coupling with vertical ridges that gave me a little more width for a better fit in the cupholder. I couldn’t find the flange I needed to fit the laptop tray, so I bought a drain fitting. While the design that inspired me, as mentioned above, did away with the drain itself, I chose a brass drain so I could put the screws/bolts through its slots when attaching it to the tray.
For the tray, I thought a wooden cutting board might work – it would be thick and already finished, so less work for me. I found one with rubber feet (on clearance, to boot). It seemed perfect – I’d put the “bottom” with the rubber feet on top, to help keep the laptop from sliding around. After installation, the rubber pads have a pretty good grip on the laptop, though Velcro would probably do the job, too. I also nailed a small piece of quarter-round molding to one edge of the platform to keep the laptop from sliding off. Position the piece depending on how your tray is angled. Since mine tends to lean backward a bit, that’s where I put the quarter-round.
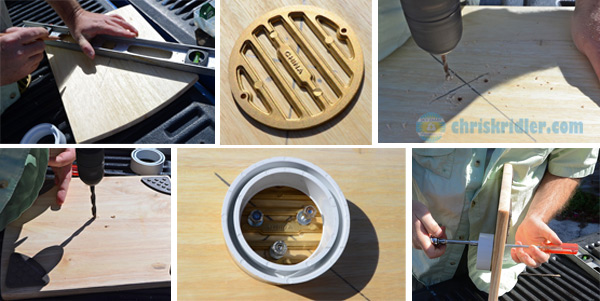
Assembling the tray involved marking the board and the bolt positions through the drain piece; drilling the holes; and applying the bolts and compression nuts and washers. Photo by Chris Kridler, ChrisKridler.com, SkyDiary.com
My husband helped with assembly of the board to the drain piece. He marked the center of the board and then marked the positions of the three bolts, using the drain as a template. He drilled pilot holes, then used a bigger bit to drill into the top holes slightly so we could counter-sink the bolts (meaning they would not stick up above the surface of the platform). Washers and compression nuts (chosen so they wouldn’t loosen with vibration) secured the bolts.
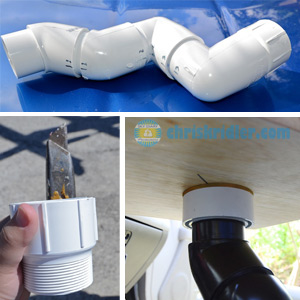
I test-fit the pipes together, marked them, then attached them with PVC primer and glue (all but the tray piece, which is not glued in my setup). I spray-painted the pipe, too. Photo by Chris Kridler, ChrisKridler.com, SkyDiary.com
Next, I worked on fitting the bottom piece with the ridges snugly into the cup holder. I’m not sure I succeeded as well as I would have liked. I used a razor knife to gradually trim away the ridges at an angle, since the cup holder is tapered. Mike’s – the one linked above – involves less pipe because the cup holder is higher, so it may be inherently more stable.
I marked the pipes where I wanted them attached, pulled them apart, then used PVC primer and glue to stick them together. I spray-painted the pipe (without the drain/tray piece) a dark brown (I like to think of it as a steampunk brown – ha ha!) so it would blend into the car’s interior a little better.
I did NOT glue the drain/tray piece onto the rest of the pipe, so that I can adjust the angle of the tray if I want to. After some use, I may choose to glue it, but it seems quite tight. I also screwed a small wooden block into the plastic box that surrounds the cup holders to support the elbow of the pipe. I expect I may do more to enhance stability as this setup gets some use. If you decide to do something like this, you’ll have to figure out the best way to make it stable for your vehicle. (See update, below.)
Here’s the laptop mount in the car. Photo by Chris Kridler, ChrisKridler.com, SkyDiary.com
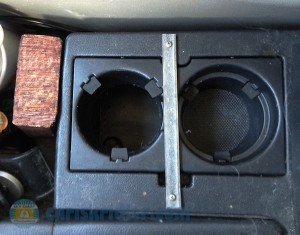
Here you can see the wood block that helps support the elbow of the pipe, the hole created by cutting off the bottom of the left cupholder, and the metal strip that holds the cupholder piece in place. Photo by Chris Kridler, ChrisKridler.com, SkyDiary.com
Update, April 23: We added a little more stability to the laptop mount last weekend in two ways. The cupholder is actually a piece that nests in a box built into the car and pops out for cleaning. I took it out and cut off the bottom of the cup where the pipe would be inserted. This allowed the pipe to rest deeper in the box and more snugly in the cupholder hole. The snug fit, however, exacerbated the cupholder piece’s desire to pop out, given that its latches aren’t designed to experience the stress of a laptop mount. So we screwed a strip of metal over the cupholder to hold it tightly in its box.
The wood block was trimmed a bit and helps support the elbow of the pipe; it’s also screwed into the box. So while this solution isn’t as elegant as Mike’s, since screws were required, I think it will work pretty well. And I can still remove the mount easily.
Posts may include affiliate links that do not add to your cost of an item but may earn me a penny here or there.